Build a Telegram Bot using Netlify
- febrero, 01 2020
- Jorge Aguilera
- 04:00
In this post I’ll show you how to build a (simple) bot for Telegram using Netlify lambda functions for execution.
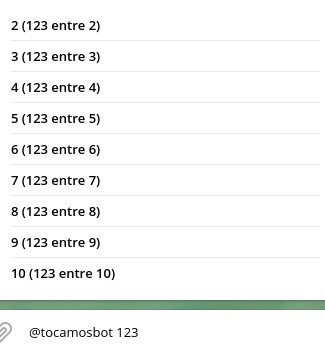
"Tocamos a…" bot (divide an expense)
@tocamosbot is an inline Bot who accepts a number (a bill for example), ask for how many participants are in
the group and returns the division or how much every participant needs to pay (a simple division)
- NOTE
-
Yes, you can do the same with a calculator but whit @tocamosbot the result is posted in the Chat ;)
Requirements
We’ll need:
-
a Telegram account in your mobile phone
-
a Netlify account (free tier) where host our bot
-
a Github/Gitlab/Bitbucket repository where upload our code. Netlify will read from there
First steps
Firstly we’ll use the @BotFather bot (from Telegram) to create our bot, so find this bot and start a conversation with it.
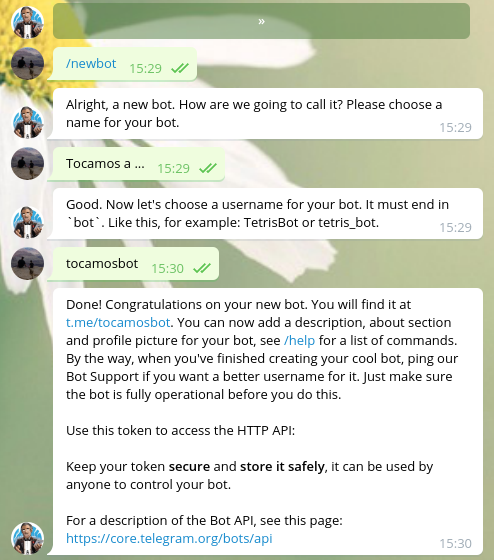
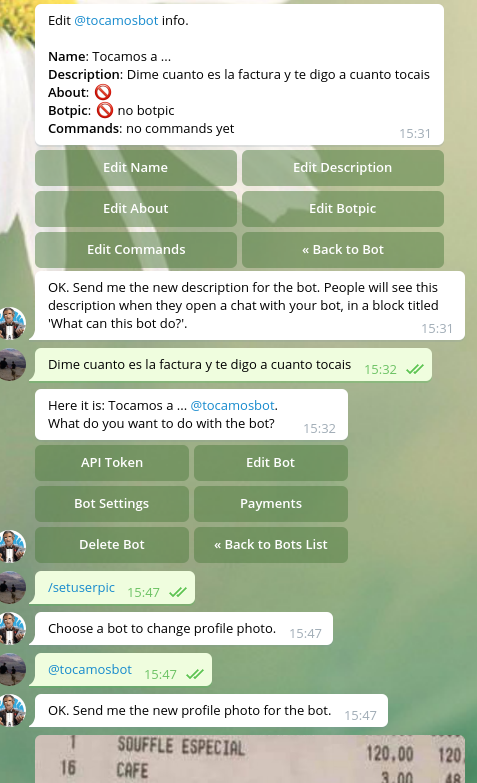
And after you can customize your bot:
The most IMPORTANT thing in this conversation is NOT TO SHARE THE API TOKEN. Be sure you don’t store it into your code, use Environment variables to access it.
Coding
In an empty directory create following files:
package.json
{
  "name": "tocamosbot",
  "version": "1.0.0",
  "description": "",
  "main": "functions/tocamos.js",
  "dependencies": {
    "netlify-lambda": "^2.0.1",
    "telegraf": "^3.36.0"
  },
  "scripts": {
    "postinstall": "netlify-lambda install",
    "buildNetlify": "netlify-lambda build functions",
    "test": "echo \"Error: no test specified\" && exit 1",
    "devNetlify": "netlify-lambda serve functions"
  },
  "keywords": [],
  "author": "",
  "license": "ISC"
}
netlify.toml
[build]
  publish = "build"
  command = "find . -name \*.mjs -type f -delete; npm run buildNetlify"
  functions = "build/functions"
Create a functions subdirectory and create following file into it:
functions/tocamosa.js
const Telegraf = require('telegraf');
const startAction = require('./tocamosa/start')
const inlineAction = require('./tocamosa/inline')
const bot = new Telegraf(process.env.TOCAMOSA_BOT_TOKEN);

bot.start(ctx => {
return startAction(ctx)
})

bot.on('inline_query', (ctx) => {
return inlineAction(ctx)
})

exports.handler = async event => {
await bot.handleUpdate(JSON.parse(event.body));
return { statusCode: 200, body: '' };
}
Create another subdirectory functions/tocamosa and put these files:
functions/tocamosa/start.js
module.exports = async (ctx, porciento) => {
	return ctx.reply(`Hi`) // better explain what the bot does
}
functions/tocamos/inline.js
module.exports = async (ctx) => {
    const search = (ctx.inlineQuery.query || "")
    if ( search==="" || isNaN(search)) {
        return
    } else {
        const answer = []
        const tocamos = [2,3,4,5,6,7,8,9,10]
        tocamos.forEach(function(tocamos) {
            answer.push({
                id: tocamos,
                title: tocamos+" ("+search+" entre "+tocamos+")",
                type: 'article',
                input_message_content: {
                    message_text: "Tocais cada uno a " + (Math.round(search/tocamos)*100)/100+" ("+search+" entre "+tocamos+")",
                    parse_mode: 'HTML'
                }
            })
        })
        return ctx.answerInlineQuery(answer)
    }
}
The code is very simple:
tocamosa.js is the entry point to our bot and we prepare all available commands to redirect to the right function.
start.js is a simple response when an user start a conversation with the bot
inline.js has the main logic. It’s called every time the user use the bot in an inline way and Telegram calls
the bot providing an argument with the text written by the user in ctx.inlineQuery.query
After check if the argument is a number we prepare a menu with 10 entries (more than 10 is a wedding and the fathers pay) putting in an array 10 elements.
Every element has an index (required but you can use whatever you want as Id), a title to show and a
message_text to show in case the element is selected.
Commit and push
You need to commit and push all files into your git repository. For example, after created the repo into your Git provider:
git init
git repository add [url-to-your-repository]
git commit -a -m "First commit, as usual"
git push
Check against your Git provider that all the files are uploaded and they follow the right structure
Netlify
Once you have a Netlify account you need to create a new site from your Git repository using New site from Git
and linked it with your repository (you’ll need to authorize the access)
From now, every push you do in your repository will fire a build and deploy process into Netlify.
In the last steps (or once deploy into the Build section) you can provide the API TOKEN of your bot using the Environment section.
As we are using in our code const bot = new Telegraf(process.env.TOCAMOSA_BOT_TOKEN); we need to set a new
environment TOCAMOSA_BOT_TOKEN with the token obtained from the BotFather
If all was deployed ok you’ll find in the Functions section the url of your bot. Something similar to
https://a-random-name-choosen-by-netlify.netlify.com/.netlify/functions/tocamosa , grab this URL and go to this
URL:
With this URL what we’re doing is to notify to Telegram where can locate our bot
Now you can test your bot in a chat and if all it’s ok the bot will answer with the menu.
| With the free tier of Netlify we have 125K request per month |
Conclusion
In this post we are see many things:
-
How to create, develop and configure a simple bot
-
How to answer with a simple message and how to build an inline menu
-
How to deploy automatically in Netlify a Git repository
-
Keep secret our TOKEN using environment variables